ART TUTORIAL- Single-Line Drawing | Mixed Media Bird | Nature Journaling Techniques
Do you struggle with creating art that feels exciting and expressive? Do you feel the need to create something beautiful but you haven’t quite mastered the mediums? Maybe you’re like me and you occasionally need an exercise that forces you to loosen up your style when you start to get bogged down with perfection.
Let me show you a simple and effective style of mixed media art that will help when your artwork starts to feel dull. Today we will use pen, ink wash, and watercolor to practice the skill of expressive markings and relaxed style with exciting results. This is a great addition to your nature journaling practice.
This post may contain affiliate links. If you use these links to buy something I may earn a commission at no additional cost to you that allows me to continue to provide useful content. Thanks.
My heart and soul long to give others the encouragement they need to create art they love— regardless of where they’re starting in their skills. Don’t feel like a “real” artist”? Want the satisfaction of creating something but don’t feel like you are “good enough”? Never fear, in this tutorial I will show you a style of inking and painting that does not require a mastery of art skills and celebrates imperfection, but still turns out beautiful. On top of that, and most importantly— it feels so good.
Getting Started
First things first, you do not have to master the skills of art before you start practicing your art skills. Let me say that again in another way, you will create a lot of ugly and embarrassing artwork on your journey to creating artwork you wouldn’t mind hanging on the wall… Notice that I didn’t say on your journey to “mastering the skills of art”?
The idea of mastery suggests an end point. It suggests that there is some ultimate level of skill that a person can attain and when they get there, they will have done and learned everything there is to do and learn. If your ultimate aim for creating is simply to become an expert at creating, it is likely that you will lose the motivation before you get there. There are too many bumps and ugly artworks along the way. If you’re judging your journey on the outcome of your work alone, it could give you the sense that you’ve failed more than you have succeeded.
Aim for expertise, and you’re likely never to arrive. Aim for the satisfaction of creating, and you’ll find that art-skill mastery is a lovely and helpful bi-product in the artist’s journey toward discovery. Discovery is endless, and it is in each and every step. Today, no matter where you are, you are capable of discovery… and that the real success.
*As an Amazon Associate I earn from qualifying purchases.
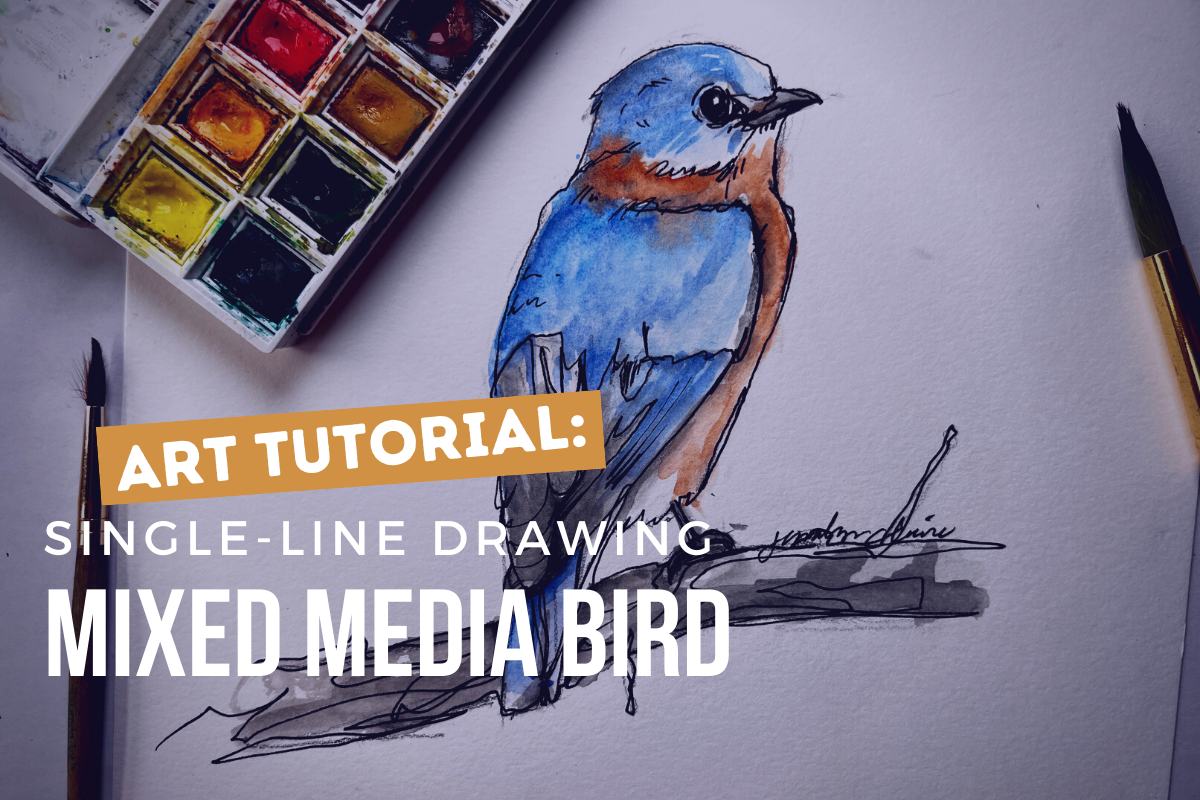
Art Tutorial - how to sketch and paint a bird with pencil, ink, and watercolor for nature journaling techniques.
Step One: Sketching your birds.
The first step in our process is to lay out a sketch of your bird or birds in pencil. If you don’t feel confident in your drawing skills, it would be great to start by reading this in depth tutorial on how to draw realistic birds. You can find it here.
This sketch does not need to be taken all the way to a completed drawing. It is only important that in your sketch you spend some time accurately placing the parts of the bird and perfecting the overall shape. It can take a bit of patience, but doing the bits that require concentrated effort (brain power) at this stage will allow you to stop thinking and let yourself go into the creative process moving forward.
Before moving on, check the accuracy of your sketch with questions like, is the eye too high or low? Does it sit just on top of the imaginary line created by where the top and bottom beak meet? Is the head the right size for the size of this particular bird’s body? Have you closely matched the outline of your sketch to the nuances of the bird in your reference photo?
If you feel that you’ve sketched an accurate bird with all things in their proper places, you can finish your sketch by very lightly making guide marks to show yourself where you see color shifts, explicit feather shapes or anything that might help guide you later in the process.
Step two: Single line drawing
The next step will be to take the sketch, which we have taken the time to make accurate, and interpret it into a single line ink drawing with a waterproof pen. I use the word “interpret” because we will use our well-thought out sketch to ensure that the final work actually looks like a bird, but the process moving forward is much looser and meant to tap into your creative, expressive side.
A single line drawing is exactly what it sounds like- a drawing done with a single continuous line. The idea is that once you put your pen to the paper, you don’t pick it up. The resulting effect is layered, overlapping lines that have the charm of overstated imperfection. Rather that trying to hide imperfect marks, lean into them and explore how they can add interest to artwork. Aim for an artwork that feels dynamic and expressive. If you accidentally get lost or pick up your pen, just place it where you left off and keep going.
Take your waterproof pen and begin to trace the outline of your bird, following any dips or feathery edges you see. At some point, you will run into a beak or a wing, something that requires you to back-track or overlap in order to add ink over your sketched lines. Don’t be afraid, just continue to trace the lines you’ve sketched, doubling back when you need to get to another part of your bird. This is a great time to add some feather detail in the wings or any fluffy bits. Use the texture and details within your bird as a bridge to get between elements.
Remember, what would be a mistake in another setting, is being done intentionally in this work. Lean into it.
Step three: Dark Ink Wash
Next we will move on to blocking in some of the darkest elements, such as the eye, followed by the areas of shadow to create a sense of form. For this you will need a water-soluble ink brush pen and a water-brush, or a paint brush and water. Water soluble, in this case, means that until the ink is completely dry, you can take a wet brush and move it around your drawing like a paint wash. I use a Faber-Castell Big Pitt Pen.
First, take a look at the eye of your bird. If you haven’t already learned this trick, I’m giddy to be the one to show you. Use your Pitt pen or your waterproof pen and shade in the eye, leaving a small circle or organic shape the white of the paper. Even when I cannot see this bright reflection in the reference photo, I will often add it because it adds to the realism and depth. You can always give it a light wash later if the white of the paper feels too bright. Continue to fill in the small areas of absolute black that you see. This may be a sharp line under the wing, or shadows under the tail or feet. Let these very dark areas dry before moving on. You won’t be moving the ink on these bits so it does not matter which pen you use.
Next, we will begin the ink wash. Squint your eyes at your reference photo. Squinting simplifies the image to reveal the most obvious light, medium and dark areas. Focusing on the dark, or even medium areas, take your water-soluble pen and add a very small amount of ink into the darkest portion of the shadow. This will usually be where it meets an edge, or the edge of another element of the drawing. Quickly take your water brush or a clean wet brush (wet, but not soaking) and begin to move the ink into the shadow area you are trying to paint.
If you are painting a dark bird, there might be numerous areas where this would be helpful, but if your bird is a lighter colored bird or doesn’t have many dark shadowy areas, you may not need to do much at all. Remember: you can always add more if you feel you’ve gone too light. Unlike watercolor, this ink will not come up once it is down, so it is better to start light and get darker than to go too dark too quickly.
(An alternative to this step if you do not have a water-soluble ink pen, would be to move straight to watercolor. If you have a black watercolor cake, like the one in this set, you can use it to create the same effects. Or you can continue adding some of the smallest dark areas of detail with your waterproof pen and use a dark watercolor to add your lighter shadows.)
Step Four: Watercolor accents and details
This last step is optional. Maybe you enjoy the look of your birds with the ink wash alone, and in that case, rinse and repeat. But, if you desire a little more it is time to grab your watercolor set.
Now, there are a few things we can do with watercolor. The simplest would be to use the watercolor to add small color accents. Rather than painting the bird in its entirety, adding just a few bright hints of color in key places can be very effective. This works especially well with birds that are mostly muted neutral colors, like grey or black and brown, or birds that have spots of color on the head, chest or under the wing.
The second option would be to apply watercolor more thoroughly over the entire drawing. Remember that you’ve created the shape and suggested the form of the bird already with your ink, and that means you don’t have to use paint to sculpt the form of your bird. It is already readable as “bird”, so you get to add paint with abandon. Don’t be afraid to let your paint fall outside the lines.
Lastly, think about using color in a completely different way. Rather than using your paint to communicate the actual colors in your birds, think about how you can communicate a feeling or idea by in the way you add color. This can be within your bird drawing, but it is also very effective in the background. Splatters and splashes, really saturated spots of intense color, color that bleeds into the colors around it… it is your world to explore. Be a rule breaker.


