Recent Blog Posts


All Blog Posts
Looking for something specific? Try searching here.

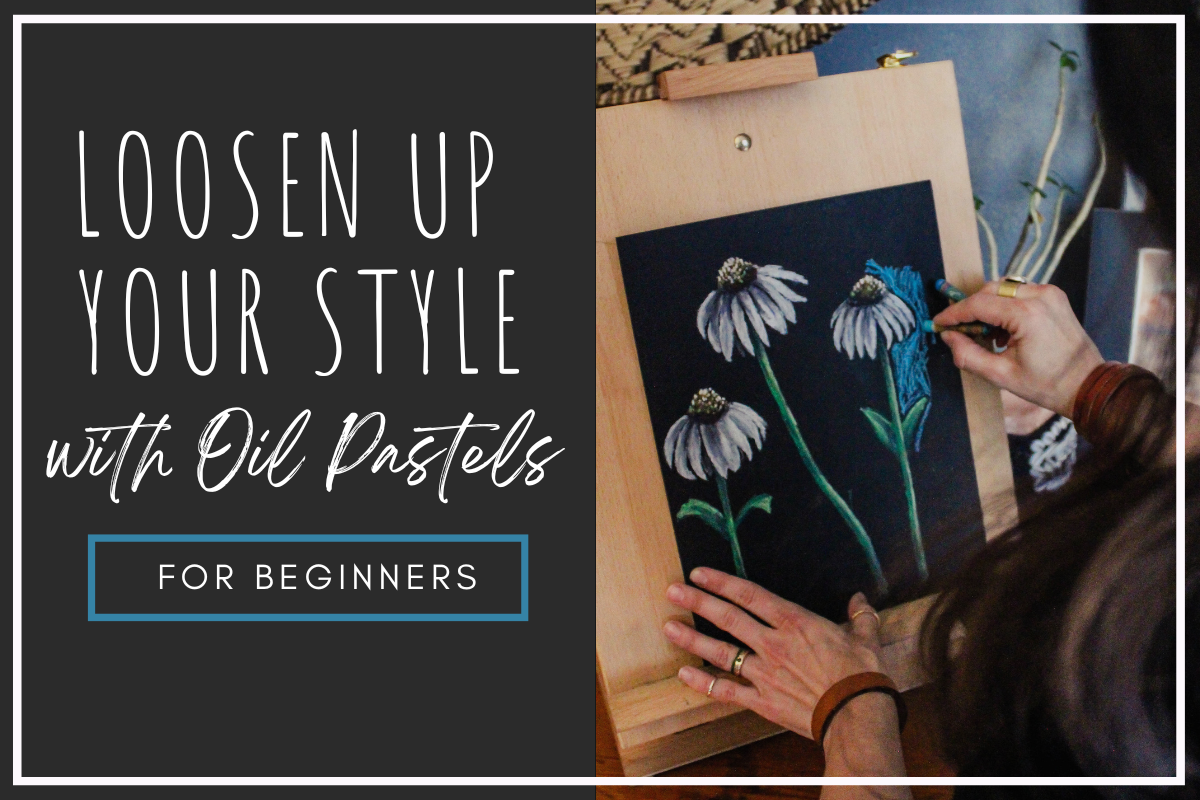
Sparking Creativity | Kids with Oil Pastels | Art Tutorial
This style is intentionally imperfect but the defining features of the bright oil pastels, with heavy black outlines, created by expressive markings on black paper is like an elevated version of the crayon scribbles we all know and love. It is amazing how this small change from crayons to oil pastels, white to black paper, and some intentional black outlines will create stunningly eye-catching artwork from the same little hands that brought you that lovely chicken-dog blob that has been hanging on the fridge since it came home from school on Father’s Day.
Sparking Creativity
Kids with Oil Pastels- Fun Winter Owl Art Tutorial

This post may contain affiliate links. If you use these links to buy something I may earn a commission at no additional cost to you that allows me to continue to provide useful content. Thanks.
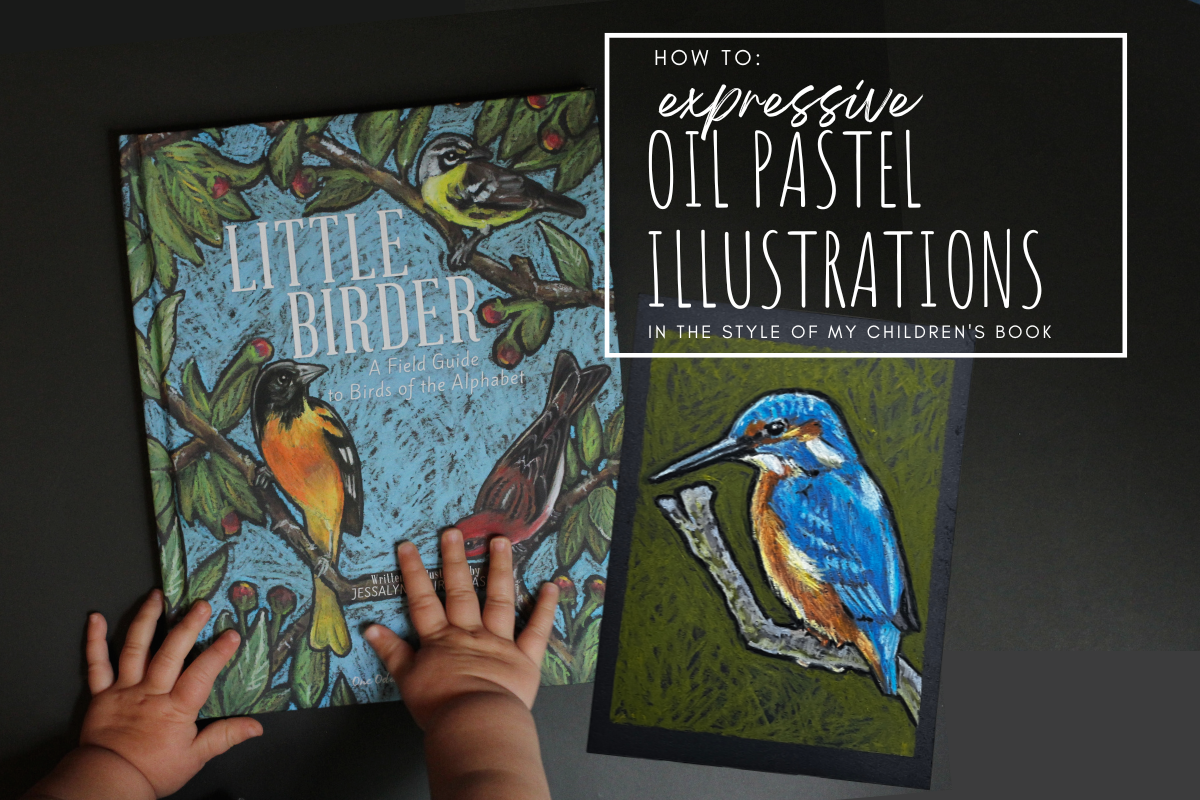
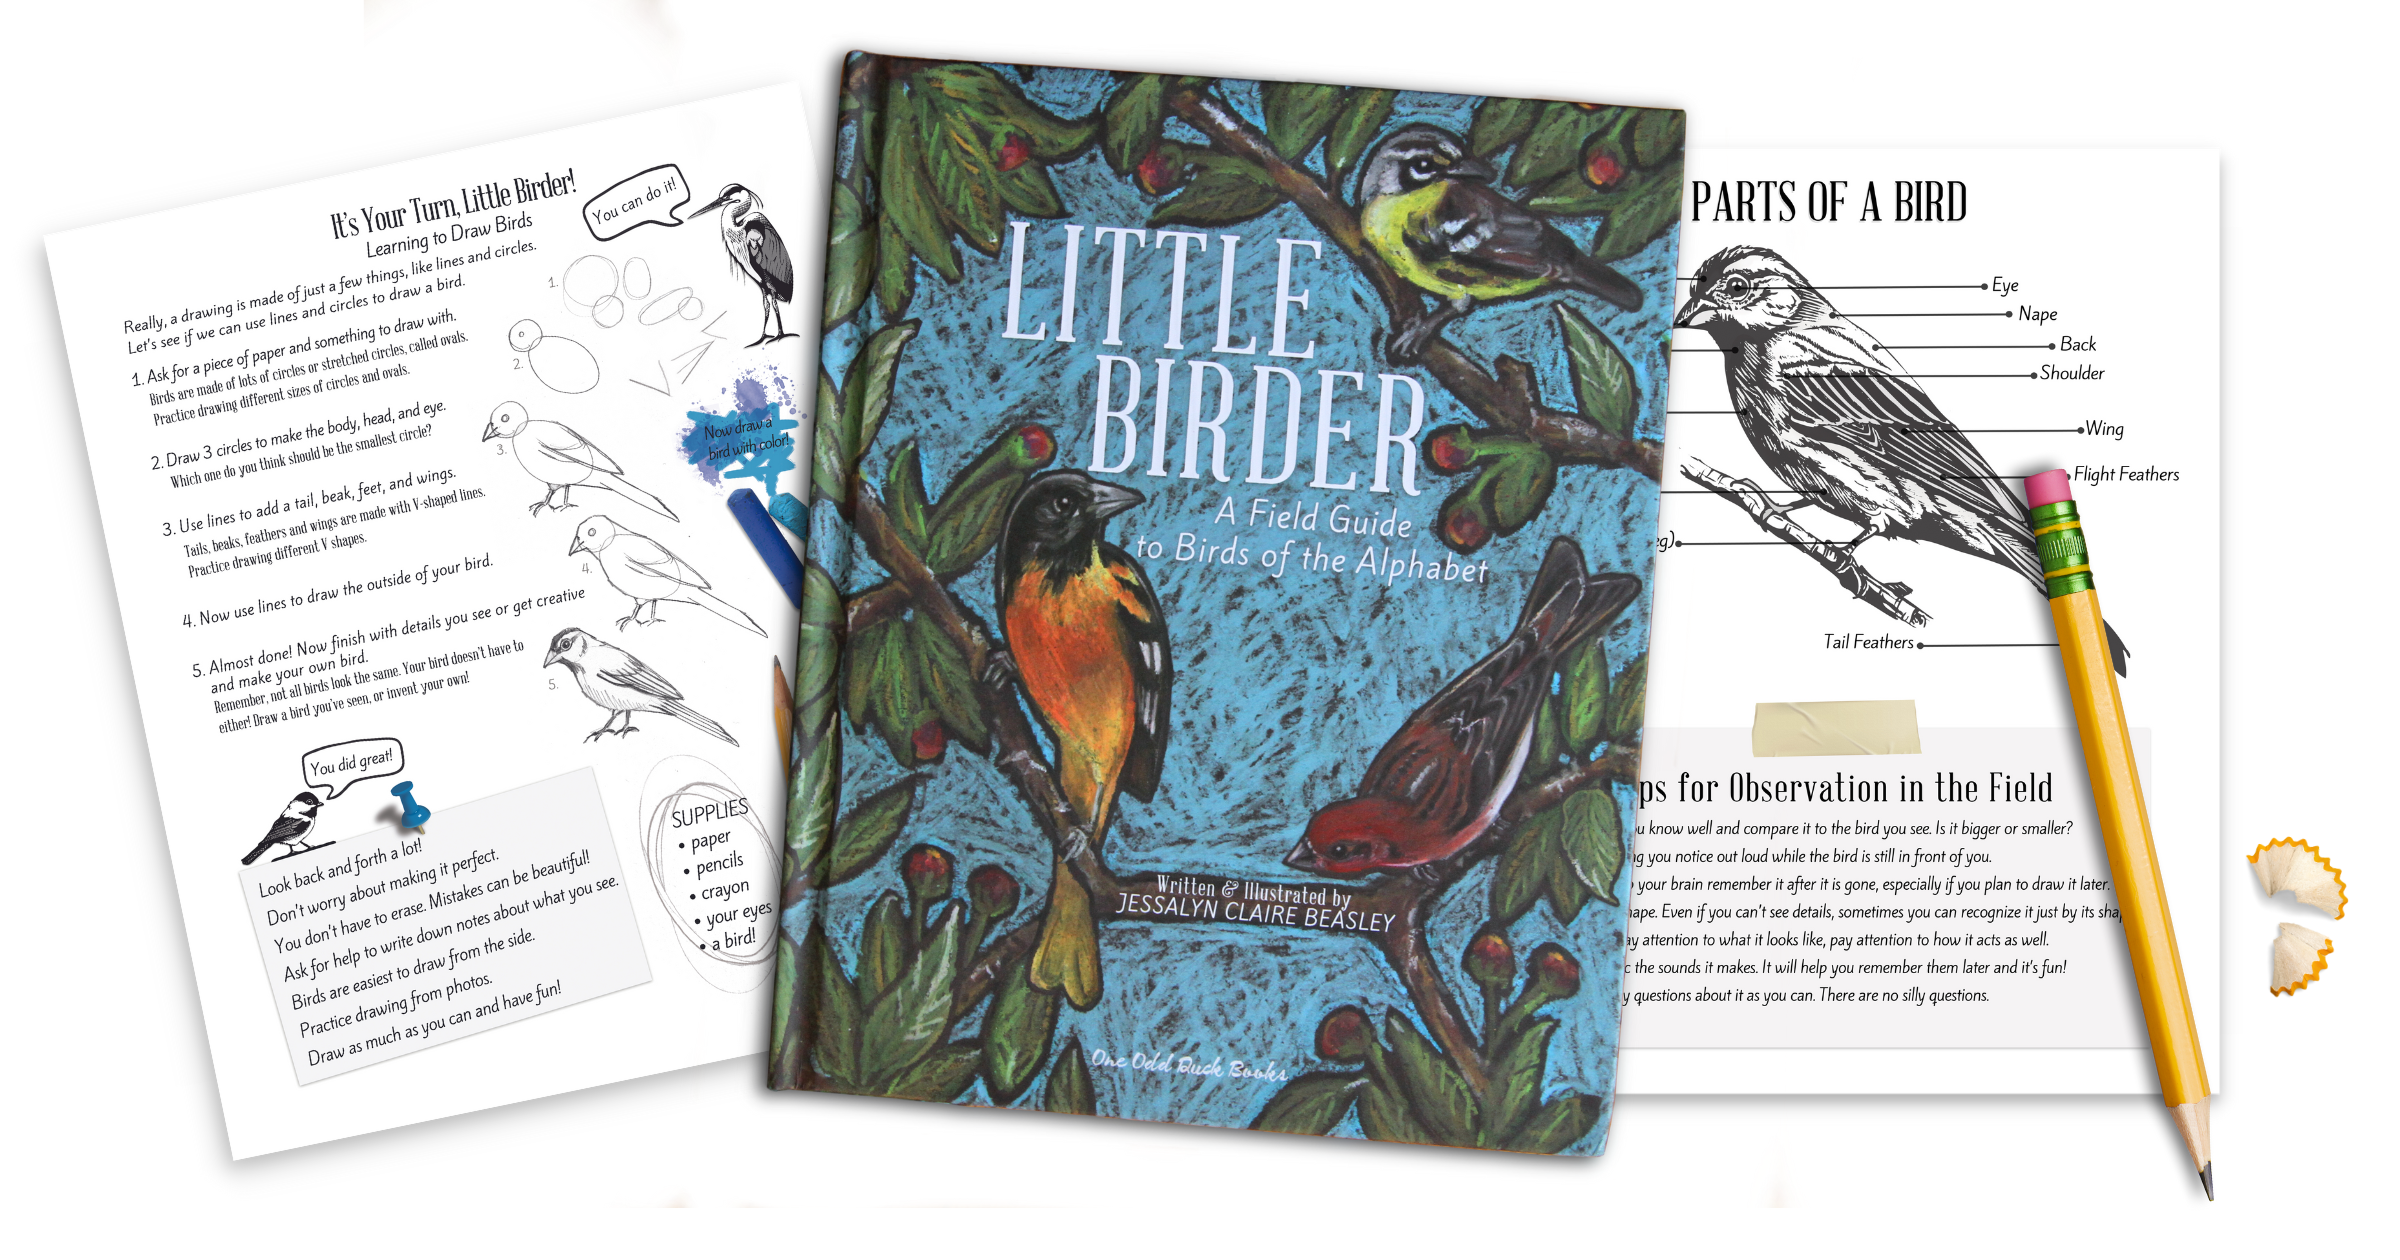
I have been familiar with oil pastels for years, but I really found a new appreciation for their potential during the creation of my children’s book, Little Birder: A Field Guide to Birds of the Alphabet. It was a mound of work to illustrate a bird painting for each letter of the alphabet, a task which I often did with my infant daughter tucked under an arm on my lap. The situation called for a medium and style that suited a one-handed illustrator, strapped to a wiggly baby making continual attempts to eat the art materials. That exciting scenario is where I first began to appreciate the forced imperfection of the stubby little crayon-like colors with a mind of their own.

Fast forward a few years and I still love the signature style of the illustrations in my book, plus I now have an artistic four year old. One day it struck me, this is a PERFECT art project for small hands and developing motor skills. The style is intentionally imperfect but the defining features of the bright oil pastels, with heavy black outlines, created by expressive markings on black paper is like an elevated version of the crayon scribbles we all know and love. It is amazing how this small change from crayons to oil pastels, white to black paper, and some intentional black outlines will create stunningly eye-catching artwork from the same little hands that brought you that lovely chicken-dog blob that has been hanging on the fridge since it came home from school on Father’s Day.
WANT TO READ AHEAD?
JUMP TO:
MATERIALS
The material needs are few for this project. The good news is that once you’ve purchased the parts, your child can continue to enjoy the surprising and satisfying outcomes of putting the bright pastels on black paper. Even without following a drawing or tutorial, those everyday scribbles can have a very modern artist-like feel.
Pencil and Eraser
Optional:
Washi Tape or Painter’s Tape for creating a clean border around the artwork
Kids' Apron to protect clothing
Brown paper roll, or something to protect table or working surface
Please note: Oil Pastels are made with… you guessed it, oil. Unlike the art materials made for children, these are not made to be washed out. If this is a concern for you, you can always opt for a water-soluble set like this and will be more likely to get it out of fabrics.
*As an Amazon Associate I earn from qualifying purchases.
Let’s begin!

Step One: Pencil Sketch
Follow the steps below to sketch your owl drawing onto the black paper. You don’t have to be too cautious because the oil pastel will mostly cover any pencil marks.

Step Two: Add Oil Pastel - Painting the owl
After you have your pencil sketch ready to guide you, you’re ready to add color with oil pastels. If you would like to use the same colors as the example find a selection of these colors: white, various browns, orange, yellow, purple, various greens and a black. Feel free to get creative with your background or details.
Optional: I really like to tape the edges of the paper so that the child can freely paint right up to the border, but when the tape is removed you’re left with a very satisfying sharp edge to the lovely work of art. If you decide to do this, make sure you “unsticky” the tape a bit by sticking it to your clothing a few times before putting it onto the paper. Washi tape is less likely to damage the paper as you remove it, but you make the judgement call. When removing the tape, pull down slowly at a slight angle outward rather than straight down.

Start adding color by taking the white oil pastel and tracing a border around each of the markings on the face. Trace around the eyes and beak, leaving the V shaped marking in the middle of the face. Trace right up next to the outline of the head and inside the body, leaving the wing black. This includes the two triangular leg shapes which will also be solid white.
After creating this border to guide your painting, freely add white oil pastel in scribbling motions into the areas that will be white. Be sure to let some of the black paper show through and don’t paint over any of the features of the face or other parts of the body. It is better to stop far away and come back later than to accidentally go too far.
Next, take a yellow or a pink oil pastel and paint the almond shaped beak, trying to stay within the line.
For the eyes, you can either leave the black of the paper showing and add white oil pastel right up to the outline of the eye to define a black circle, or you can fill in the eye with the black oil pastel. The black oil pastel will cover all other colors of oil pastel, so it is great for cleaning up that black eye circle if you happened to accidentally go too far with the white. To finish the eye, add a white spot on either side of the eye for the reflection, keeping it to the same side of each eye.
Take a brown oil pastel and draw the two lines that run from the inside of the eye down to the beak that create a sort of V-shape. Then add a curved line a small distance from the bottom of the beak to separate the shape of the white face from the white body.
With a lighter brown, gold, or even a light orange color, trace the shape of the wing, defining it from the white of the body with a black outline. Add a light layer of this color inside the wing and then add the darker brown to the upper and lower portions of the wing on top of the first color. Add a few strokes of white in a few spots in the middle portion of the wing.
Take the same two colors and add a “headband” of color to the top of the owl’s head. You can overlap with the white a little to blend the colors.
Choose a color for the feet. I liked the pop of purple against the other colors and the green background, but you can select something true to real life if you prefer it. Draw over the sketch of the feet with your oil pastel however thick or thin you find appealing.
Step Three:Add Oil Pastel- The Background
Remember that the crux of our style is the heavy black outlines that separate large elements from one another in the painting. This can be hard for younger children, as it is a bit like having to stay inside the lines and requires somewhat matured motor skills. You can assist by tracing their owl with the background color and leaving a black outline that is a safe distance away from their work, this allows them to go wild up to that line without as much risk of overlap. Then take the green colors (or bright blue could be nice too) and start filling in the background to look like the spiky needles of a pine or evergreen. To mimic the original style, try to leave some black showing through the marks rather than covering the background surface in oil pastel.
Again, the black oil pastel will cover the other pastels, so you could alternatively let your child try to leave the border and fill the background on their own and then help them redefine the black border anywhere that it has disappeared or needs to be made bolder. You can also clean up the black outlines within the owl in areas like around the wing, and around the beak if you choose to.

AND DONE!
Add some initials or signature, peel the tape and you’re done! Like oil paint, oil pastels take a long time to fully cure so your art will stay somewhat sticky and smear-able. If you would like to spray your art to seal it, try a couple of layers of a matte fixative like this one. (Follow the directions! Adults only.)

Click the image to sign your child up for an oil pastel lesson with me on Outschool.com!

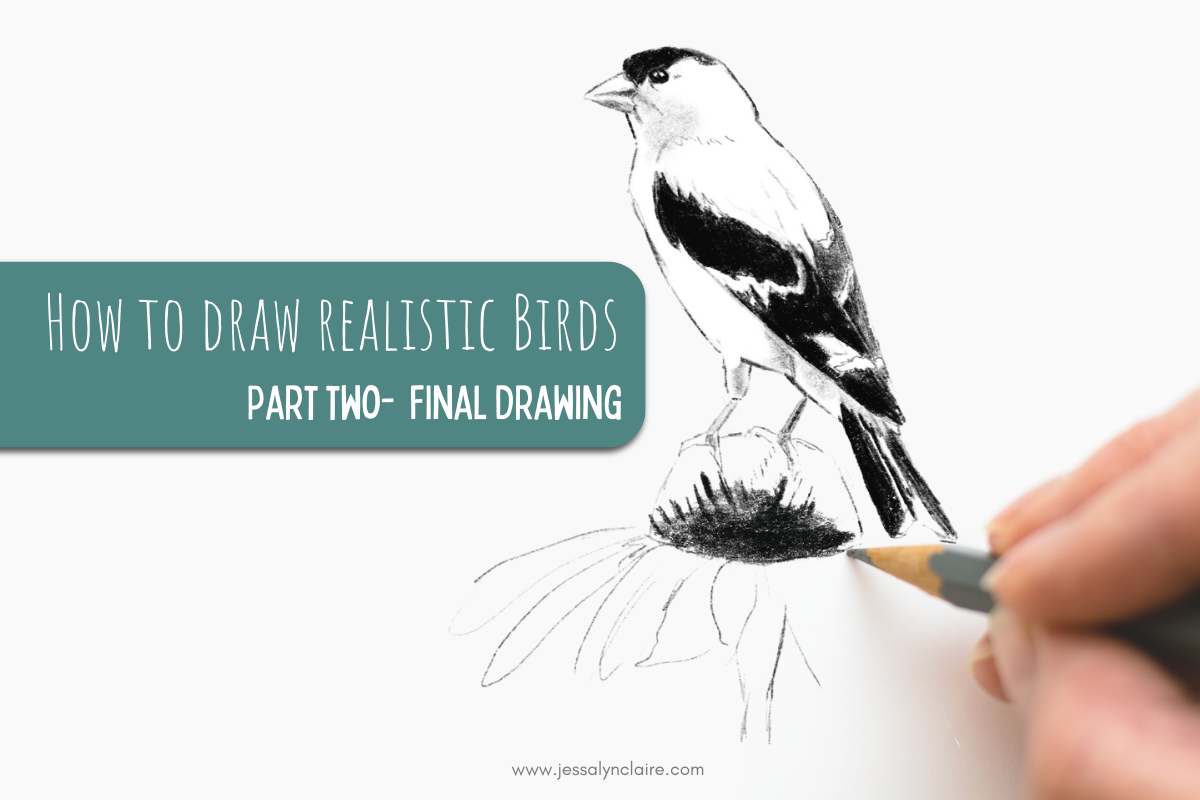
How to Draw Realistic Birds- Part Two- Final Drawing
Let’s pick up where we left off…
When I talk about the two different stages of a drawing, I will often refer to the sketch stage as the “thinking part” and the drawing stage as, “the artistic part”, because that is essentially what they are. The sketch is the stage of a drawing that forces you to slow down, use your brain as you measure and study and adjust until your drawing is as accurate as possible.

How to Draw Realistic Birds
Welcome back! Don’t forget to sign up to download the How to Draw Realistic Birds- Part Two PDF below.
This post may contain affiliate links. If you use these links to buy something I may earn a commission at no additional cost to you. Thanks.
Part Two- Final Drawing
Welcome to the second part of the How to Draw Realistic Birds tutorial. In part one, we learned how to see and use basic shapes to create a sketch that will be the foundation of our drawing. In this post, we will move on to the “artistic” part of our drawing, and let’s be honest— the part we all came for.
Let’s pick up where we left off…
When I talk about the two different stages of a drawing, I will often refer to the sketch stage as the “thinking part” and the drawing stage as, “the artistic part”, because that is essentially what they are. The sketch is the stage of a drawing that forces you to slow down, use your brain as you measure and study and adjust until your drawing is as accurate as possible.
The second stage is the stage of adding shading and details that make it come to life. Before we fully move on, have you adjusted your outline and erased the leftover shapes from our very first few marks? Don’t move on to your shading and details until you’ve checked the shape around the head and neck, checked to see if any of your proportions need adjusting… make any changes that you notice need to be made at this stage. They are harder to adjust later on.

Shading & Details
Shading Practice
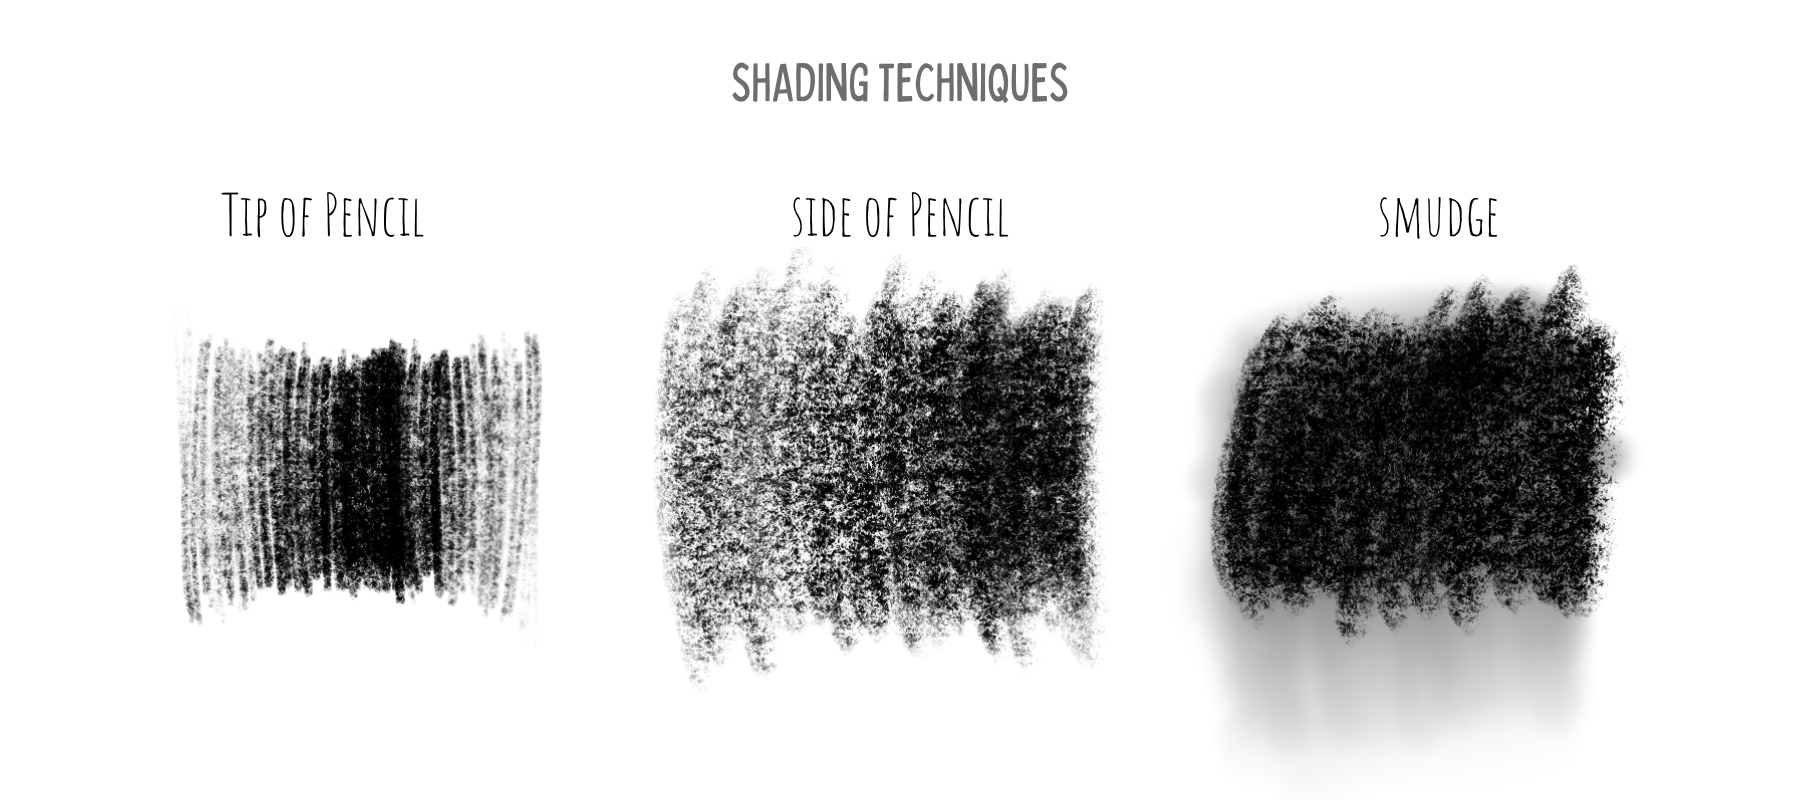
I like to make a few notes about the techniques of shading before we get into the process.
Shading with the tip of your pencil: I’m sure this is obvious, but one method of shading uses the pencil in the same position as when you write, where the tip of the pencil is touching the paper. It may be obvious, but that doesn’t make it easy. Smooth, controlled shading in this way is a skill that has to be developed and practiced. Use this method on a drawing that you plan to spend a lot of time completing (because it is slow), small areas of shading like the eye, and for texture marks.
Shading with the side of your pencil: Another option would be to grip your pencil slightly farther back toward the eraser and apply the graphite with the side of the pencil. Doing so applies the pencil in a softer and faster way. You are still able to create variations of dark and light by pressing harder or going over areas without as much time or delicacy. This is great for drawings which you do not intend to spend a long time completing.
Lastly, and this is somewhat contested among artists, but you can smooth and blend your shading by smudging. I do recommend practicing controlled shading, but it is your drawing. No one cares if you use your finger and soften up those shades. Blend areas of shading by rubbing in circular motions with your finger or tissue. You can even create a smooth gradient by smudging pencil into areas of the drawing that do not have any shading. Use this as a first layer to come back on top with texture or further shading.

Step one: creating contrast
Darkest and lightest areas

There are multiple ways you could go about the next few steps. For the sake of learning, there must be an order, but in your own practice it is more likely that you will find yourself switching between shading and details as it feels right. There is an intuition that you will develop for the process.
Because I believe in some instant gratification as motivation, I recommend starting the shading by finding the very darkest areas of the drawing as well as the lightest. The paper is most likely white and you cannot get whiter than the white of the paper, so in that case we simply leave out the areas of highlight. So those are already taken care of and all you need to do is find the darkest areas.
Squint your eyes at the reference photo. Doing so will take away detail and reveal to you larger shapes of various shades of color. Notice any areas that are so dark when you squint that you can more or less fill them in as dark as possible with your pencil. Some of these areas will not have sharp borders, but they will fade into lighter areas so you will also want to replicate this by fading those darkest areas. Some areas thought may have edges, like the eye.
2. The eye is my favorite place to start because it is quick and very gratifying. To shade in the eye, fill the eye in as dark as possible, but leave out a small organic shape, like a circle, the white of the paper. Even when I don’t see this reflection in the reference photo, I will still add it to the eye. This is because it taps into the way our brain processes shape. As artists, we are putting flat lines and shades onto a paper and attempting to make them look 3-dimensional. This one simple trick will instantly make the drawing look more realistic because the viewer’s brain will recognize it as the highlight that happens on a sphere with a light source. (Step 1. is the last step from the basic sketch.)
3. From here, shade the areas that you have deemed to be the darkest. Because they are areas to shade as densely as you can, you do not have to be quite as deliberate and slow as in areas that require more variation and attention to detail. Immediately, you will see a high contrast in the drawing. By doing this, the form will take shape and it also identifies a value range. By determining the outer limits of our values, it makes it easier to then see the middle values that fall between white and black, or those middle values that will require more deliberate shading (effort).
Step two: suggesting texture
Drawing Feathers
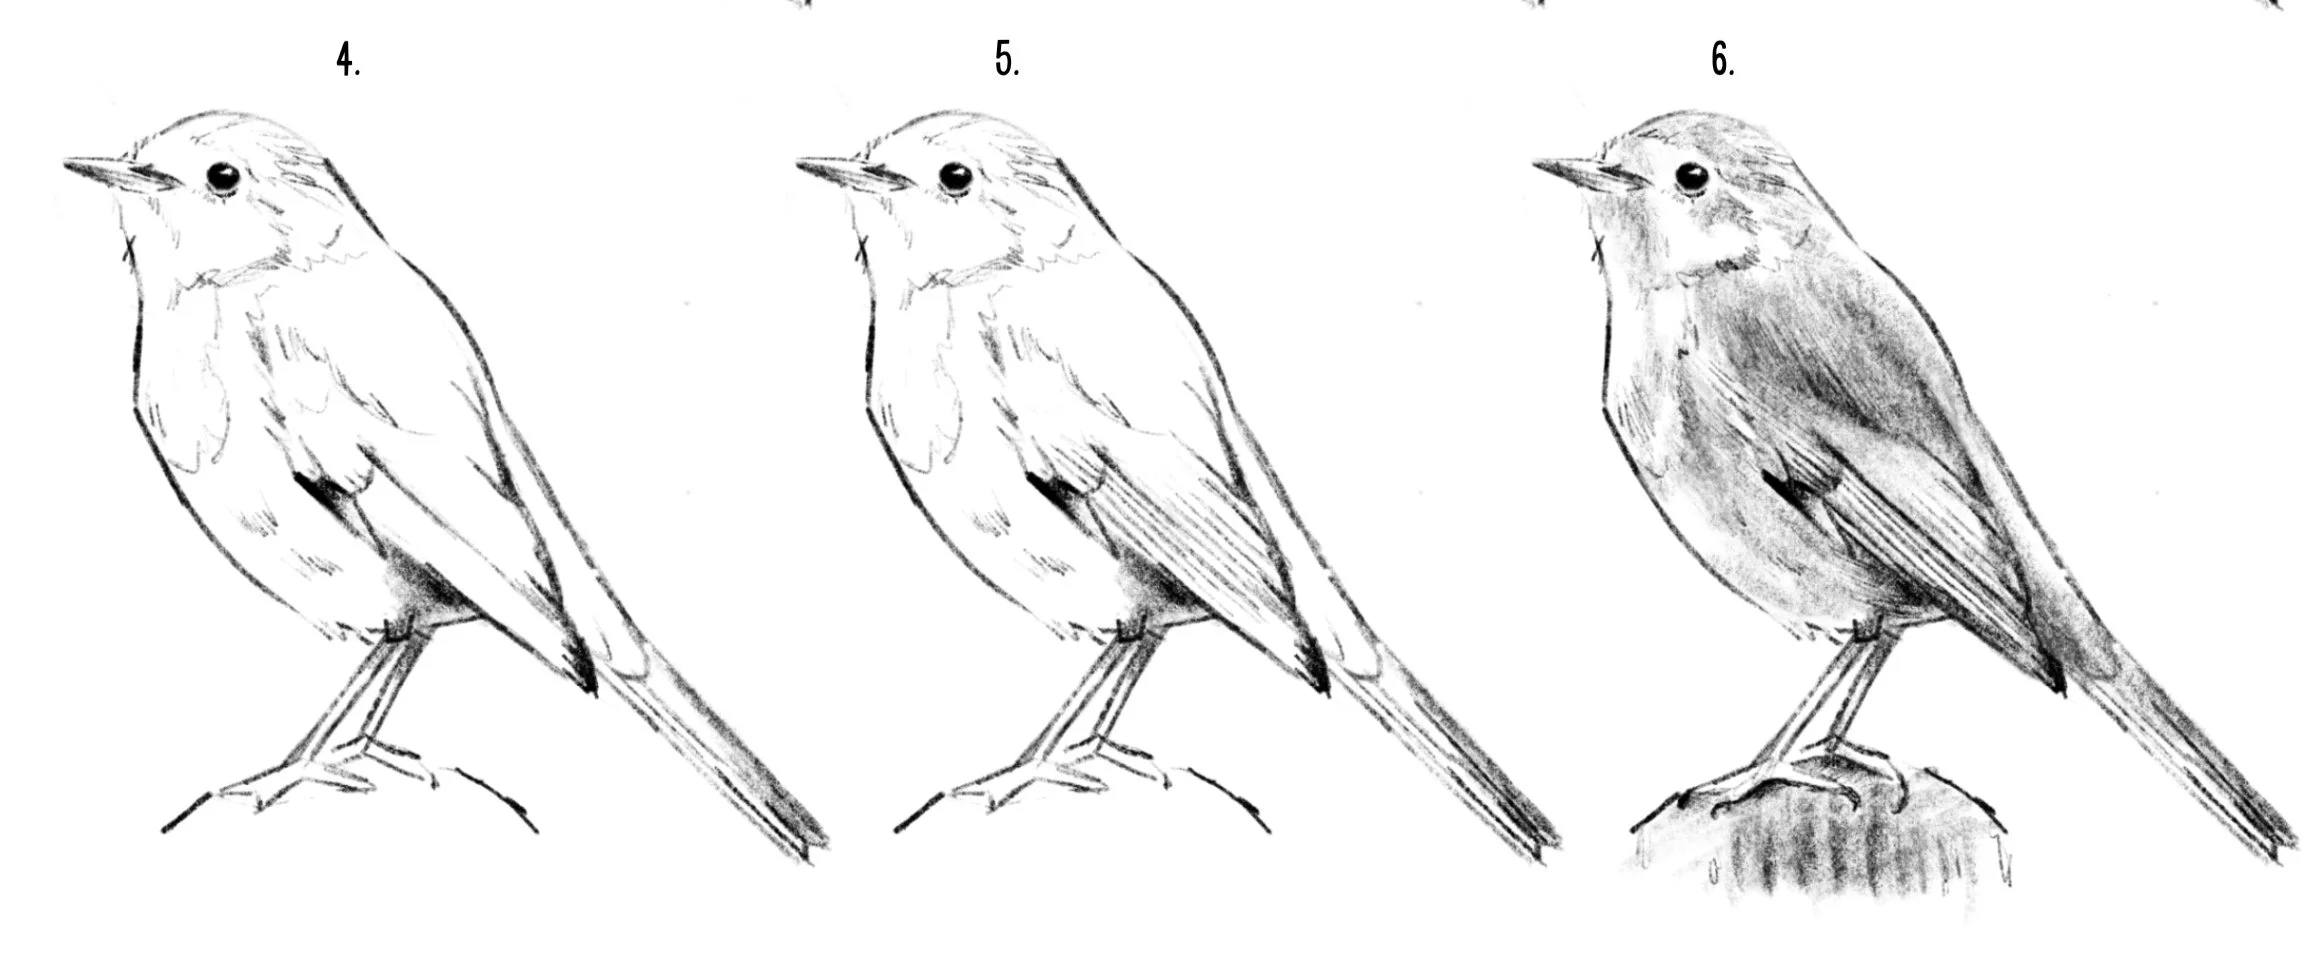
The shading is not complete, but before moving on, let’s take a look at suggesting texture, in this case- feathers.
Often, new artists or young artists will fall into the trap of drawing what they know is there whether they see it or not. A bird is covered in feathers, and most likely, you already know that. So your very intelligent machinery (brain) kicks in and says, “Great. Let’s cover this thing in feathers.” The result will look something like the photo below, and not very realistic. However, by zooming in very closely and tracing what we actually see… you can see clearly that even though there are feathers covering the bird, we do not actually see feathers. What we see are the SHADOWS of the upper layer of feathers being cast on the feathers below. And they often look like hash lines, v or w shapes, squiggles, dots— anything but feathers— but this IS what we see, so this is what you need to draw.
This is called “suggesting” feathers. That is because you are suggesting that they are there without drawing the feather shape. Similarly, you do not need to cover the entire drawing in these lines. You only need to add them to the key areas to suggest the texture. If you struggle to know where to add and where to leave them off, squint again to remove the detail and only add them in some of the areas where you still see the suggestion of them in the reference. You might often see these at the line where the head and body meet, the chest and belly area, and along fluffy edges of the outline.
Step three: Middle values and detail
You are now aware of the skills required to complete your drawing. It is time to go back and forth between these methods and practice your intuition. Look closely at the value in different areas on the body, filling in a smooth value of grey or dark grey in any area of shadow. Use your feather shadow marks to show texture or even to darken areas of shadow. Use light lines for texture in highlight areas and use heavy, dark lines for texture in areas of dark feathers or shadow.
Conclusion
An inspiring artist and naturalist, John Muir Laws, said, “Every drawing is practice for the next.” What he means by this is, if our primary focus each time is on the outcome of our drawing and whether we end with a pretty picture, then sometimes we will succeed but we will likely fail in equal proportion. In the journey toward becoming the artist you would like to be, there will be drawings that you do not enjoy when you are finished. Holding pretty outcomes as your highest aim makes you vulnerable to discouragement, and even vulnerable to giving up. However, if when you sit down to draw you are approaching it as if it is always practice for the next drawing that you do, then regardless of the final product you will have a successful drawing. Each time you intentionally put time and effort into your skill you WILL learn and gain something. You are literally creating new connections in your brain each time you exercise the effort of your skill.
So, more important than all, aim for discovery and get comfortable with the idea of imperfection. That will be your fastest road to art success.
Love all things birds and art?
Click the image below to grab a copy of my children’s book, Little Birder: A Field Guide to Birds of the Alphabet.
Click here to read How to Draw Realistic Birds Part-One


How to Draw Realistic Birds- Part One- Starting with a Sketch
Drawing skills are the foundation of any art practice. Knowing how to draw opens a world of possibilities on which to build your creativity. That is because the basis of great drawing skills is observation. In order to draw well (realistically), we have to draw accurately. Drawing accurately means obeying the rules of nature, tapping into the way the brain works, and knowing where it sometimes steers us wrong.

How to Draw Realistic Birds- Part One
This post may contain affiliate links. If you use these links to buy something I may earn a commission at no additional cost to you. Thanks.
Drawing skills are the foundation of any art practice. Knowing how to draw opens a world of possibilities on which to build your creativity. That is because the basis of great drawing skills is observation. In order to draw well (realistically), we have to draw accurately. Drawing accurately means obeying the rules of nature, tapping into the way the brain works, and knowing where it sometimes steers us wrong.
First of all, what do we mean by realistic?
How to Draw Realistic Birds- Part One- Sketch
Have you ever seen a drawing or a painting that looks so real that you can’t tell whether it is a photo or an artwork? That is probably what is conjured for many people when they envision realistic art. And it’s true, that is realistic. In fact, it is so much so that it is called photo-realistic, or hyper-realism. But that isn’t the only type of realistic artwork. For this lesson it is important to realize that when the word realistic is used, what I mean is “accurate”.
Are the proportions accurate? Is the head the correct size for the body? Is the tail the correct length, the wing the right length? Does it have the identifying marks of the bird that we are using as a reference. Have I created a sense of form (3D) by adding shadows and highlights strategically? Basically, does this look like the thing I am trying to draw?
(Psst… you can download the FREE How to Draw Realistic Birds- Part One PDF below!)
Step one: Basic Map Sketch
The drawing will be done in two parts, starting with a sketch. While teaching children this process, in order to illustrate the important purpose of a sketch in realistic drawing, I began to call this step a “basic-map-sketch”. I call it “basic” because it begins by using basic shapes that you already recognize and understand very well to build the overall structure of your drawing. I call it a “map-sketch” because it does for us as artists, what a map does for a traveler. If I’m going somewhere I’ve never been, I don’t simply take off and start guessing which direction to go. I get out a map, look at all of the lines and angles, and get a sense of the picture as a whole to understand where I am going and then I start. To start off with guesses would take longer, involve more mistakes and it’s likely to require turning around and going back a few times.
Think about your sketch as a safe place to make mistakes. The sketch is the place that we slow down, engage our brains and rework as much as necessary until we get things correct. There are two common downfalls in drawing. The first is impatience. For many of us, a sketch is tedious and delays the gratification of seeing a drawing come to life. There is a tendency to rush through the preliminary parts of our drawing, that include the important element of accuracy, to move to the more satisfying parts. The second is the fear of mistakes. For many of us there is the pressure to get things “right”. Oddly, the idea that we cannot make mistakes in our process can create the temptation to leave marks the page that are not correct, simply because they were the first marks we made.
Going into the sketch portion of your drawing with the expectation to make “mistakes” takes the pressure of perfectionism out of the picture. It is difficult to be willing to erase a mark you’ve lovingly placed, but be willing to change it and work at it until it is right.

Learn to see the basic shapes
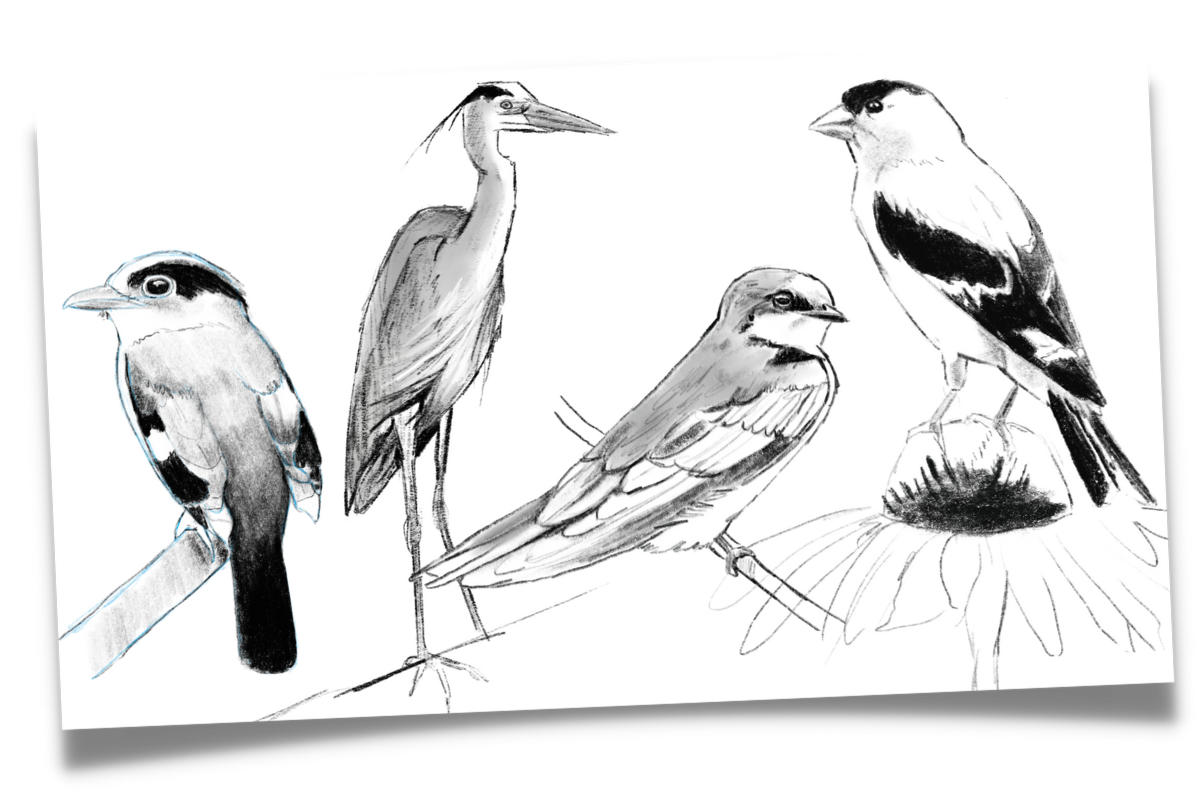
First let’s have a quick practice at seeing the basic shapes within a bird. (Animated GIF of appearing shapes over bird image, take away image) It may take some imagination and practice for this to become a natural process, but over time it will become more second nature to break down a complicated shape into smaller, more basic parts to see the structure. Remember, you’re not looking to fit your bird sketch into a mold with a certain type/number of shapes. What you’re really doing is attempting to make connections in your brain between what you are observing and pieces of information you already have. It sounds a bit unbelievable, but by making these simple comparisons such as, “The head reminds me of a circle.” it creates new connections in the brain and your ability to see the object in front of you with more accuracy will increase.


Step by step sketch
STEPS 1-7

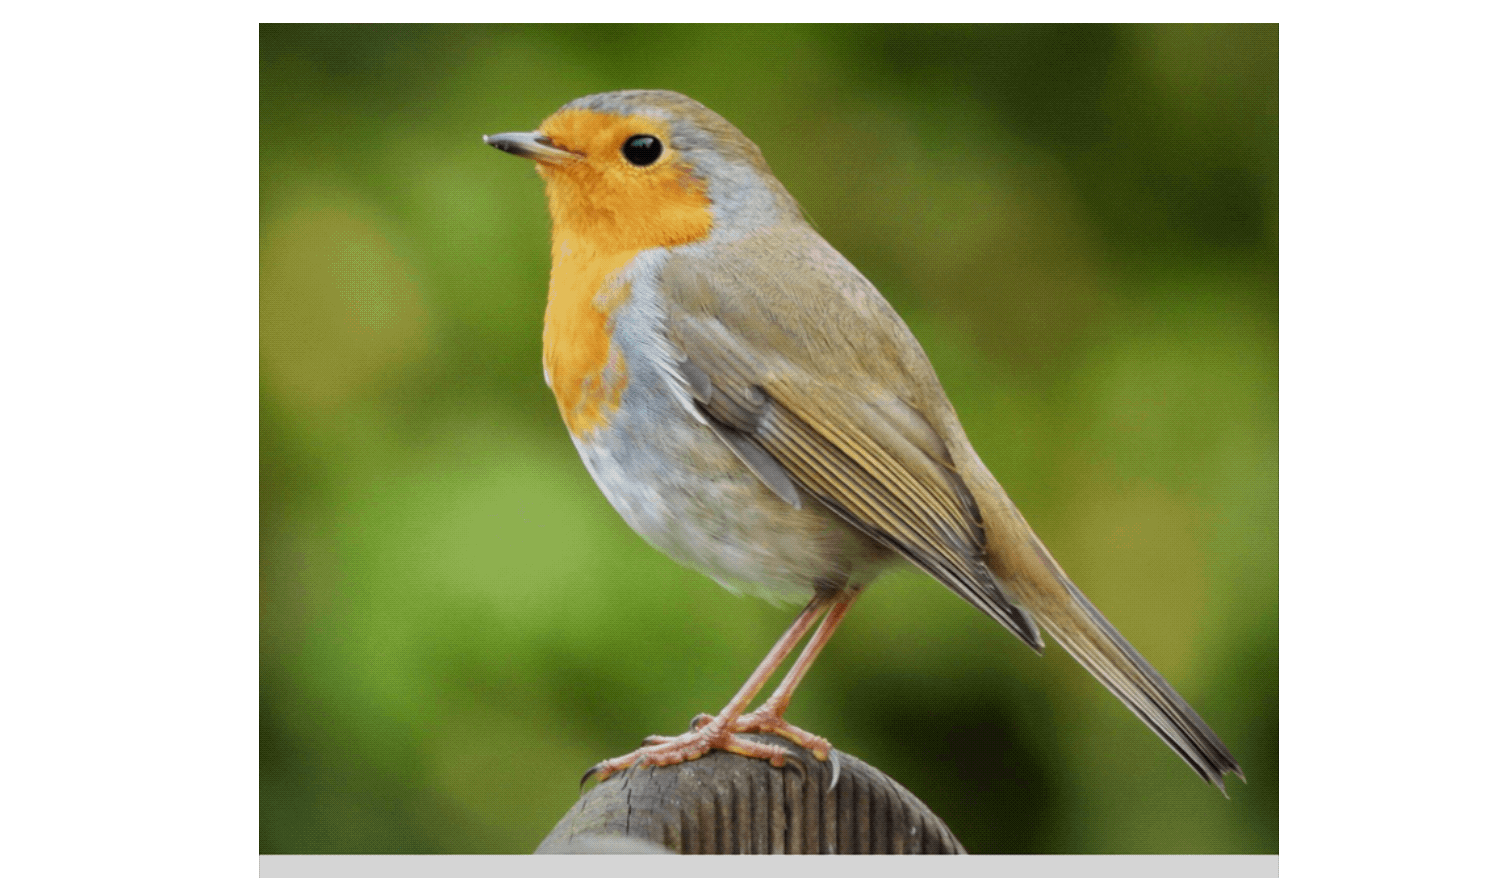
Posture line: Start by sketching a line at the angle of the posture of the body. The oval we will draw for the body will be drawn on top of this line. Do not try to draw the angle of the bird overall, focus on the angle of the largest portion of the body. The head will often be set at a completely different angle. This line helps ensure you sketch the overall shape in the correct position.
Circles: Visualize the circular shape of the body and head. Pay close attention to the size comparison between the two body parts. You do not have to over generalize the circle shape. The aim isn’t to over-simplify the structure into simple shapes, the aim is to make connections between shapes you already recognize and the shape you are trying to observe.
The beak line: The next trick is a great example of how knowing the way nature behaves can make us better artists. In many birds, and most songbirds, if you were to visualize (or sketch) a line where the top and the bottom of the beak meet and continue it out the back of the head, you will find that the eye will sit right on this line. The second benefit of this line is that it shows clearly how the bird’s head is tilted. These small details of angles can trip up an artist. It is the sort of small detail that causes that sensation of something being “off” in your finished drawing, but often not obvious enough to know what exactly it is that looks wrong.
Then draw the beak around that line, paying close attention to the size and shape of the beak. Is it short and fat? Skinny and sharp? It is important to notice that unless the bird is facing directly to the side, the beak shape WILL cross over and into the circle you’ve drawn for the head. You will see illustrated or simplified birds with a v-shaped beak popped right on the side of the head, but in real life birds are more often looking toward or away at an in-between angle. Add the eye sitting just on top of the line you’ve created, trying to study the shape, and the distance between the beak and eye closely.
Wing shape: As seen above, many wings can be simplified into one or more v-shapes or triangles. Estimate the length of the wing the best you can, realizing that as you add information to your drawing, it will become more clear whether you have accurately estimated the length. The wing is an area where I often have to make changes at a later stage.
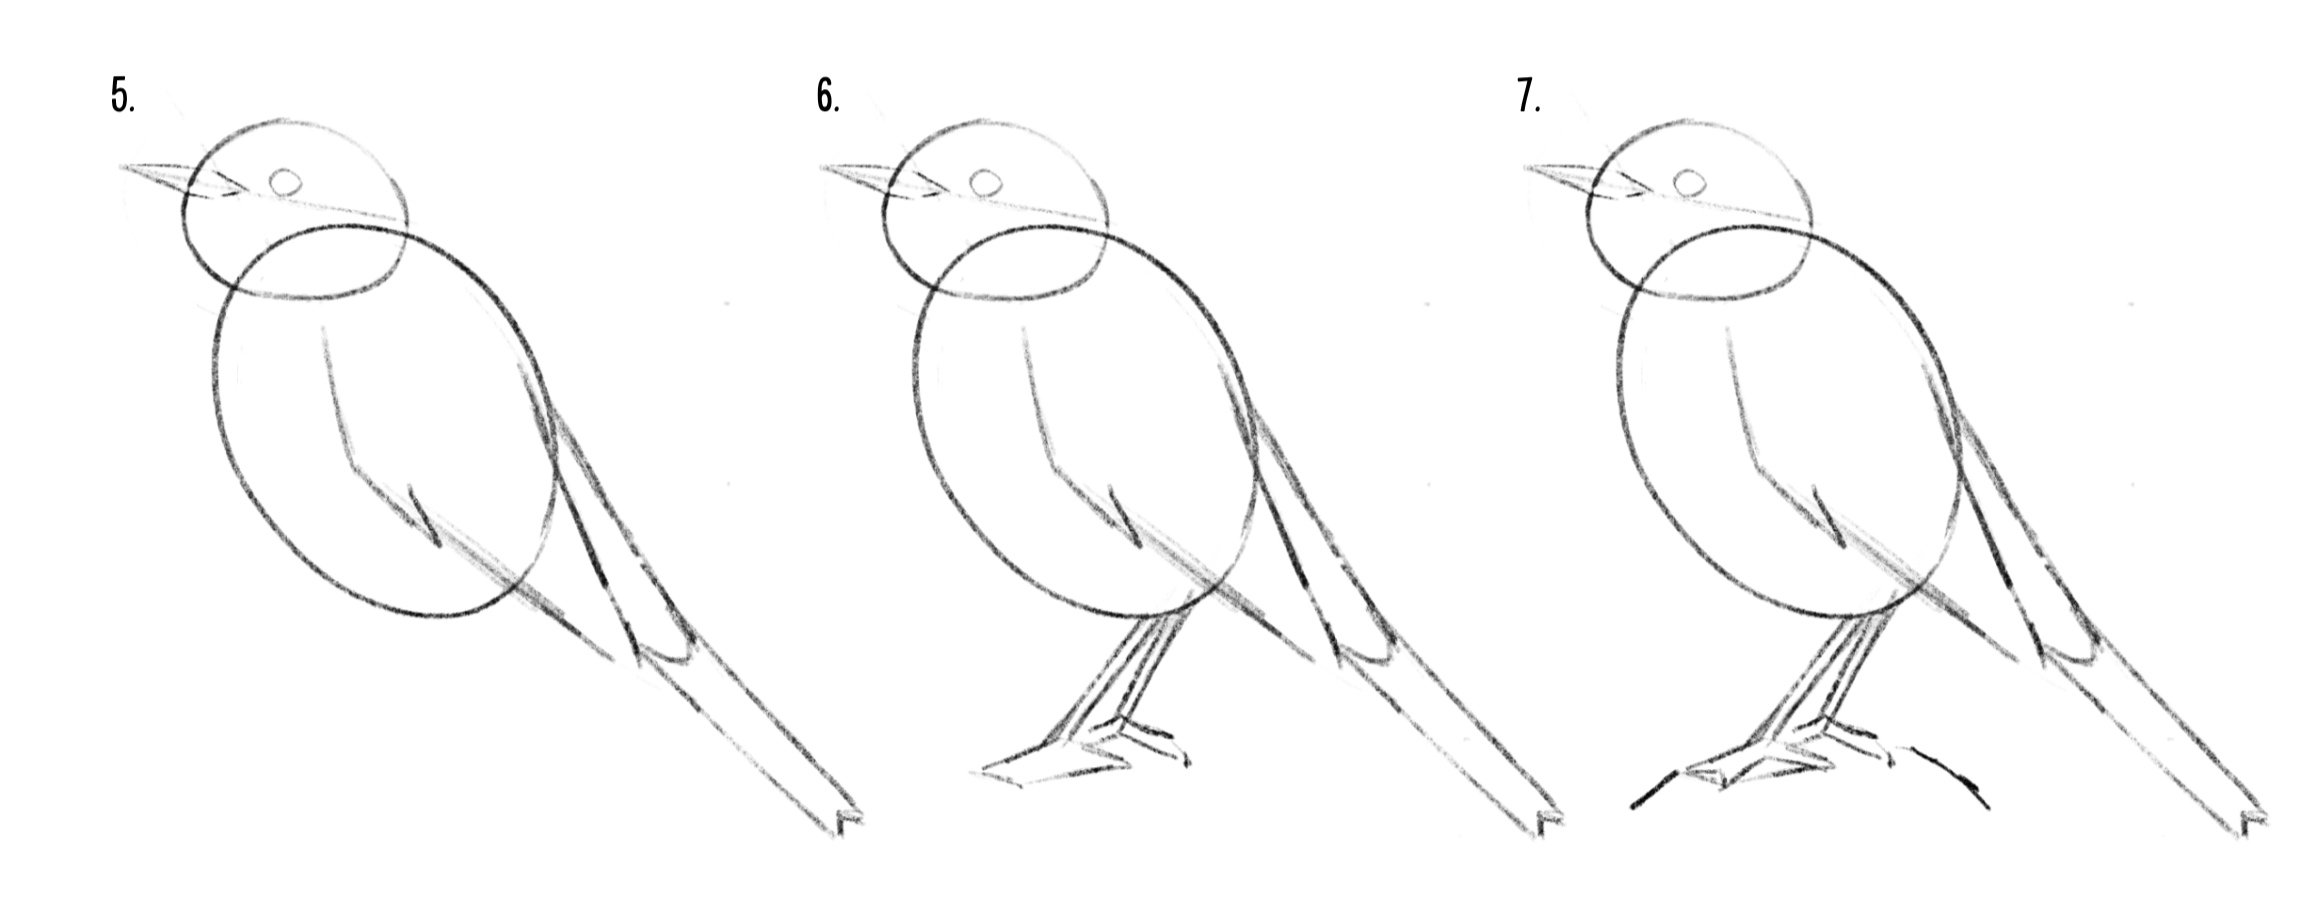
5. Tail: Often you will find a triangle where the tail and the body meet, or a rounded V-shape when looking at the tail from the front. In this bird we barely see the space where the tail and body meet, but we do still see a small indication of the v-shape feathered section that I am referring to. Sketch this shape in to give the proper angle from the body and then draw the tail, paying close attention to the angle of the tail. Use a simplified shape that you plan to correct later or draw it with the nuance you see in it.
6.Perch and legs: There are a few ways to approach this last portion of our sketch. The bird we are drawing is not flying, but it isn’t floating. So we need to add a place for it to perch in order to draw the legs and feet. There are a few ways to add the branch or surface where a bird is perched. One way is to simply estimate. This is not a bad system. Lightly sketch a line roughly where you visually estimate the perch to be, keeping in mind that if it is too close or too far away it will impact the length of the legs.
7. Or an alternative method is to look between the legs at the negative space. You can visualize the shape that is created by the space between the legs and perch, and draw this shape. (In this case a thin triangle.) The lower edge of the shape will be the perch or top of the feet, and show you how far from the bird these need to be drawn. The legs can also be drawn by this method of visualizing the shape of the negative space. The same shape you have drawn, if drawn to accurately match the image, will also provide the inside line of the legs. You can follow it by simply drawing the opposite side of each leg.
*The alternative to adding the legs this way is to simple measure and visualize the angles of the legs. This will often create a triangle that has the same helpful effect of helping you check your work. Draw these angled lines very lightly onto the bird, paying attention to where they connect to the body, and then finish by drawing your thin bird legs around these lines.
Feet: For today, we will draw a simplified version of the feet. Often, the position of a bird’s foot will visually appear to be a dark mass of toes rather than a foot with distinct features to pick out.
Using straight lines, simplify the overall shape of the foot, ignoring the space between any toes. Not only is this helpful in ensuring that the posture of the foot is correct, and makes it much easier to draw, but it’s a helpful way to observe the way the feet work to better understand how to draw them in the future.
Lastly, once again we go to the negative space. See how the space between our toes and our shape create a triangle? Recreate those triangles within the geometric shape we used to draw the foot and then erase the outer lines. Voila. C’est finit.
perfecting the outline
STEPS 8-10

Congratulations. You have finished your basic map sketch. However, these next steps are arguably the most important. The reason being that without it, using the basic shapes would make our drawing look less realistic, rather than more. Drawing with these basic shapes can really increase the accuracy of your drawings, UNLESS you get to this point and leave it as it is. We’ve used two ovals to capture the proportions and shape of our bird, but as is, it can be reminiscent of another object made with stacks of circles… a snowman! That is why I warn students against “the snowman bird.” For some reason it is very difficult for young students to remember not to leave the ovals from their sketch in the final drawing.
If we trace the outline of a snowman onto our bird image, we see very clearly that is not the shape of the bird. So, before doing any details or shading in our drawing, we must take a moment to refine the outline and shape of the bird. DO NOT FORGET THIS STEP. I know you’re ready to see this drawing come to life, but trust the process. If you leave this step off, you would be better off to draw by simply studying the outline.
Taking a close look at the reference photo, draw a line coming from below the beak to meet the body. Then study the angle at the front of the head that comes out of the beak and then the shape of the head. Finally, following the outline you observe in the photo, connect the head to the body oval along the outline, adjusting the size and shape as necessary.
Now, erase the leftover lines from the original shapes…Ahhh, that feels good. Doesn’t it?
The last step for part one will be to lightly mark out the various color changes along the body and major wing detail. This allows your brain to visualize the bird’s 3D form better. The brain needs surprisingly little to be able to fill in the missing information and understand what is going on. Think about the wing detail with the shape basic shape breakdown as the overall sketch. You are taking a larger, more complicated shape and breaking it down into smaller, simple shapes. You do not have to add every detail, just focus on the big shapes within the wing. Taking a moment to add in the wing detail will save you from having to stop and re-engage that part of your brain once you’ve moved on to the artistic, intuitive part of the drawing.
Whew, you did it!
Way to go, you’ve created your basic sketch. Now go have a cup of tea first, or move straight to part two of How to Draw Realistic Birds by clicking here!
Wait, there’s more!
You may be an adult, but that doesn’t mean you can’t watch the free video tutorials for kids from my Outschool class, here. Be sure two watch the learning video and the guided drawing video of a Black-capped Chickadee.
Or, get your copy of my children’s book about birds, Little Birder: A Field Guide to Birds of the Alphabet here.
Check it out!

Sometimes at this stage we have to trust the process even when it doesn’t feel like it is looking great. How do you feel about your sketch? Let me know in the comments below.
